Breast Augmentation Recovery: Complete Week-by-Week Guide 2026
Talk to our team
In this article 21 sections
The most important thing to understand about breast augmentation recovery before anything else: the result you see at six weeks is not your final result. Your body needs months to fully relax around the implants, and the shape you will ultimately have looks meaningfully different from what you see in the first weeks.
This guide gives you an honest, specific week-by-week account of what recovery actually looks and feels like — what is normal at each stage, what you can and cannot do, what the drop and fluff process really involves, and what most guides do not tell you before surgery.
Breast Augmentation Recovery at a Glance
| Milestone | Timeline |
| Return home from hospital | Day 1 |
| Shower | Day 2–3 with clearance |
| Return to desk work | Week 1–2 |
| Drive a car | Week 1–2 (off prescription meds) |
| Sleep on side | Week 3–4 |
| Drop and fluff begins | Week 3–6 |
| Light cardio | Week 3–4 |
| Full exercise / chest work | Week 6–8 |
| Underwire bra | Week 6–8 |
| Drop and fluff complete | Month 3–6 |
| Final result | Month 6–12 |
| Scar fully matured | Month 12–18 |
Understanding Implant Placement — Why It Affects Recovery
The most significant factor determining recovery experience is where your implant is placed. There are two main positions:
| Subglandular (over the muscle) | Submuscular / Dual plane (under the muscle) | |
| Immediate discomfort | Lower — muscle not disturbed | Higher — pectoral muscle stretched |
| Drop and fluff | Faster — begins weeks 2–3 | Slower — begins weeks 3–6 |
| Natural movement | More natural immediately | May feel tight during exercise long-term |
| Implant visibility | Higher risk in thin patients | Better coverage, lower visibility |
| Capsular contracture risk | Slightly higher | Slightly lower |
| Mammography | Slightly harder | Slightly easier |
| Best for | Patients with adequate breast tissue | Most patients — especially thin or athletic |
Implants placed under the muscle (submuscular) may involve more initial discomfort and a slightly longer period for the implants to drop and fluff compared to implants placed over the muscle. Knowing which placement you have helps you interpret your recovery accurately — submuscular patients should not be alarmed by a slower settling process.
Week-by-Week Recovery Timeline of Breast Implants
Day 0 — Surgery Day
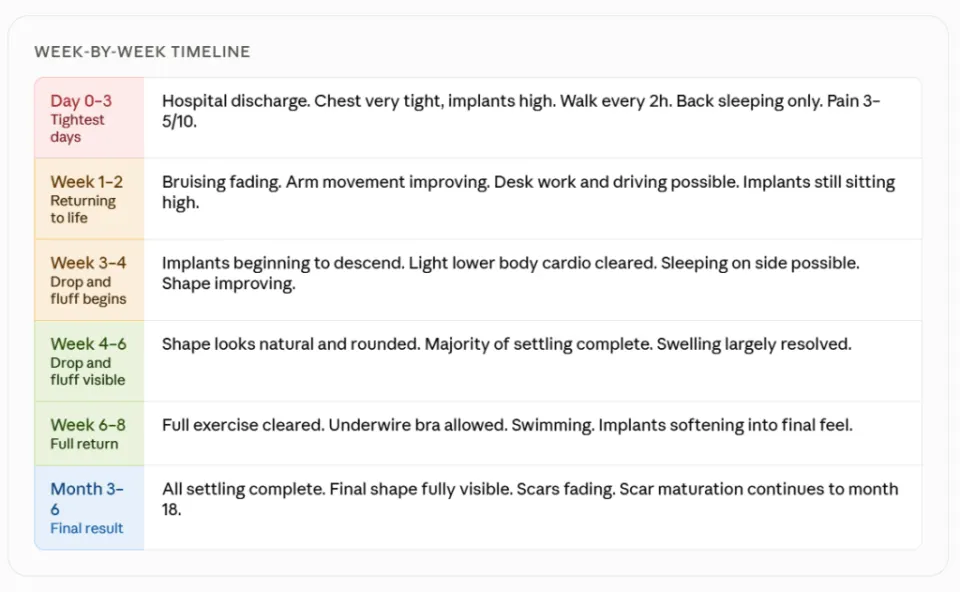
Breast augmentation takes 1–2 hours under general anaesthesia as a day case or with 1 night hospital stay. You will wake in a surgical support bra. Implants sit high on the chest — this is normal and expected.
What you will notice:
- Breasts sitting noticeably higher than their final position — the pectoral muscle has not yet relaxed
- Tightness across the chest — most pronounced with submuscular placement
- Swelling present immediately
- Pain is most significant in the first three days but is well managed with a modern, multimodal pain control plan. Most women find the discomfort is less than they expected and can transition to over-the-counter pain relievers within a week.
- Grogginess from general anaesthesia
Pain level: 3–5/10 for submuscular; 2–3/10 for subglandular. Tightness is the dominant sensation more than pain.
What to do:
- Rest with upper body slightly elevated — reduces swelling
- Begin gentle walking immediately — short circuits every 2 hours for DVT prevention
- Take all prescribed medications consistently
Days 1–3: The Tightest Days
The first three days are the most physically demanding of breast augmentation recovery. The chest feels tight, the implants sit high, and movement — especially raising the arms — is restricted.
What you will notice:
- Significant tightness across the chest with every arm movement
- Implants appearing very high and round — not your final shape
- Swelling and bruising at their peak
- Difficulty with basic tasks requiring arm elevation — getting dressed, washing hair, reaching for things
- Sleep disrupted — you must sleep on your back with upper body slightly elevated
What to do:
- Sleep on your back with 1–2 pillows under your upper body
- Let people help you with tasks requiring arm elevation
- Wear the surgical support bra at all times except showering
- Take prescribed antibiotics and pain medication on schedule
What NOT to do:
- Reach overhead or push/pull with your arms
- Lift anything over 2 kg
- Sleep on your side or front
- Remove the surgical bra
Days 4–7: Improving Daily
By days 4–7, most patients notice a meaningful shift. The first week requires the most TLC — but by the end of it, most patients feel significantly more functional.
What you will notice:
- Bruising at its darkest — may extend beneath the breast crease
- Swelling beginning to stabilise
- Arm movement improving — still restricted overhead but daily tasks becoming easier
- Implants still sitting high — no drop and fluff yet
- Energy returning — most patients feel well enough to move around comfortably
What most patients can do by end of week 1:
- Shower as cleared (typically day 2–3)
- Short walks outside
- Basic self-care with care
- Light desk-based tasks from home
Week 2: Returning to Normal Life
For a sedentary or desk job, many patients return to work within one to two weeks, as directed by their surgeon.
What you will notice:
- Bruising converting to yellow-green
- Swelling reducing meaningfully — first hints of shape emerging
- Arm range of motion improving noticeably — though reaching overhead may still feel restricted
- Breasts are still sitting high, and the implants have not yet begun their settling process
- Energy levels close to normal
What most patients can do by week 2:
- Return to desk work
- Drive — once off all prescription pain medication
- Light daily activities and household tasks
- Short walks
What to continue avoiding:
- Any upper body exercise
- Heavy lifting
- Sleeping on side (unless specifically cleared)
- Underwire bras
Weeks 2–3: Drop and Fluff Begins
Drop and fluff describes the gradual process where your pectoral muscles relax and the implants settle from their initially high position into a more natural placement. As the muscle releases tension and the implant pocket matures, the implants shift downward (the drop) while the lower portion of the breast fills out and softens (the fluff), taking on a more natural shape.
What you will notice:
- Implants beginning to shift — very slightly lower, slightly softer
- Asymmetric settling is one of the most common concerns during recovery, and it is almost always normal. One breast may swell more, bruise differently, or begin the drop and fluff process before the other. This typically equalises within a few weeks to a couple of months.
- Upper fullness beginning to soften
- Shape looking more natural than week 1
Weeks 3–4: Light Exercise Returns
During weeks three and four, your surgeon may clear you to resume light, non-impact cardio and lower body exercises. However, direct chest exercises and heavy lifting are still off limits.
What you will notice:
- Drop and fluff becoming more visible — lower pole of breast filling out
- Swelling approximately 50% resolved
- Implants noticeably softer than week 1
- Sleeping on side often possible by week 3–4 — confirm with surgeon
What most patients can do by weeks 3–4:
- Light lower body cardio — walking, stationary cycling
- Most normal daily activities
- Sleep on side (if cleared)
- Begin scar management — silicone gel on incisions from week 3–4
What to continue avoiding:
- Any chest exercises — press, fly, push-up
- Heavy lifting — nothing over 4–5 kg
- High-impact exercise
- Swimming until incisions fully healed
Weeks 4–6: Major Milestone
Weeks 4 to 6: the drop and fluff becomes much more noticeable. Breasts will look and feel softer, and the shape will appear more natural and rounded. For many, a significant portion of the settling is complete by six weeks.
What you will notice:
- Shape looking close to natural — most patients feel their result is becoming visible
- Upper pole fullness softens and the lower part of the breast fills out
- Scars visible but softening at the edges
- Implants feeling significantly softer than weeks 1–2
What most patients can do by week 6:
- Return to all normal activities including most exercise with a supportive bra
- Swimming (once incisions fully healed)
- Upper body exercise with surgeon clearance — starting light
- Underwire bra — typically cleared at week 6–8
Months 2–3: Final Shape Emerging
You will have a very good idea of your final results by the three-month mark. At this point, the majority of swelling is gone, and the drop and fluff process is largely complete, revealing a softer, more natural shape.
What you will notice:
- Shape very close to final — the result you hoped for is clearly visible
- Visible changes typically begin around 6 to 12 weeks. Submuscular placement tends to take longer than subglandular. Full maturation can take several months.
- Scars fading from pink to lighter
Months 3–12: Final Result
By six months to a year, all significant swelling has resolved, your implants are fully settled, and your scars have begun to fade.
The final 10–20% of settling — particularly in submuscular placement — happens slowly over months 3–6. Scars reach their palest, flattest appearance at 12–18 months.
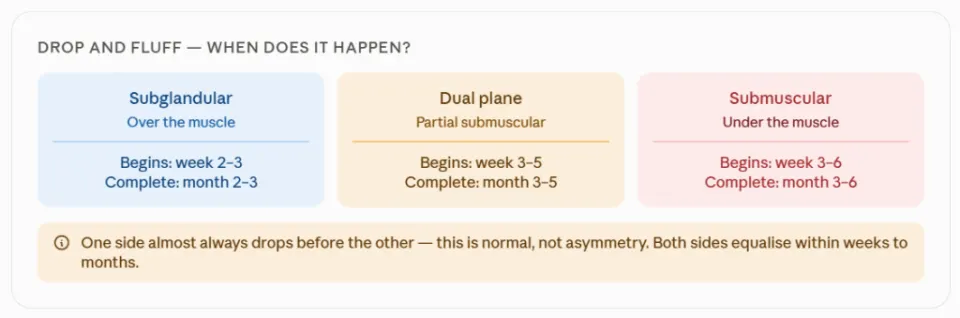
Drop and Fluff: The Complete Explanation
Drop and fluff is the most discussed and least understood part of breast augmentation recovery. Most patients have heard the term before surgery but are not told specifically what it looks like, when it happens, or why it occurs differently for different patients.
What is actually happening:
The implant itself does not change — it stays the same size and shape throughout. The implant moves downward by a few centimetres, which sounds small but makes a dramatic visual difference. What changes is the surrounding tissue:
- The pectoral muscle (submuscular placement) gradually relaxes its grip on the implant — allowing it to descend
- The skin and breast tissue stretch and accommodate the implant's lower position
- The lower pole of the breast rounds out and fills as the implant settles
- The upper pole softens from the initially full, round, high appearance
Why one side drops faster:
Asymmetric settling is almost always normal. Slight differences in muscle tightness, tissue characteristics, and lymphatic drainage mean one breast almost universally begins the process before the other. Most patients see equalisation within weeks to months.
When it happens by placement:
| Placement | Drop and fluff begins | Largely complete |
| Subglandular (over muscle) | Weeks 2–3 | Month 2–3 |
| Submuscular (under muscle) | Weeks 3–6 | Month 3–6 |
| Dual plane | Weeks 3–5 | Month 3–5 |
Dropping is mostly complete by week 8 to 12 for most patients. Fluffing is the softening and rounding that follows dropping.
What patients most often get wrong about drop and fluff:
The anxiety peak of recovery — weeks 3–6 — is when many patients feel the result is worse than week 1. This is because the initial post-surgical swelling has reduced, the implants still sit high, and the drop and fluff has not yet produced visible change. This temporary in-between phase is not the result and does not indicate a problem. This is the part of recovery that requires the most patience, and it is where anxiety runs highest.
Bra Guide: What to Wear and When
The bra you wear during recovery directly affects healing and final positioning. The wrong bra at the wrong stage can displace an implant before the pocket has stabilised.
| Phase | When | Bra type | Schedule |
| Surgical bra | Day 0 – Week 2 | Provided by surgeon — soft, front-fastening, no underwire | 24 hours/day except showering |
| Support bra | Week 2 – 6 | Soft, supportive, no underwire — sports bra style | 24 hours/day except showering |
| Transition | Week 6 – 8 | Lightly structured, still no underwire unless surgeon clears | Daytime |
| Normal bra | Week 6 – 8+ | Underwire with surgeon clearance | As desired |
Why no underwire for 6–8 weeks: Underwire sits directly on the lower pole of the breast — where the implant is settling. Pressure from the wire can displace the implant from its intended position before the pocket has fully formed and stabilised. This is not a conservative recommendation — it is based on the biomechanics of implant positioning.
Practical tip: Buy 2–3 quality front-fastening soft support bras before surgery. Side-fastening and pull-over styles are nearly impossible to manage alone in the first week.
Activities: When Is It Safe?
| Activity | When |
| Gentle walking | Day 0 — essential |
| Showering | Day 2–3 with clearance |
| Desk / sedentary work | Week 1–2 |
| Drive (off prescription meds) | Week 1–2 |
| Light lower body cardio | Week 3–4 |
| Sleep on side | Week 3–4 with clearance |
| Swimming | Week 6 (incisions healed) |
| Full gym / upper body | Week 6–8 with clearance |
| Chest exercises (press, fly, push-up) | Week 6–8 minimum |
| Underwire bra | Week 6–8 with clearance |
| Heavy lifting | Week 6–8 |
| Sexual activity | Week 3–4 with clearance |
| Long-haul flight | Week 2–3 with clearance + compression stockings |
What Nobody Tells You About Breast Augmentation Recovery
- The first three days feel harder than most patients expect Most patients are told recovery is "easy" compared to other surgeries. The tightness from submuscular placement — the most common technique — is genuinely uncomfortable, and the restriction on arm movement affects every aspect of daily life in the first week. It is not unbearable, but it is worth being prepared for.
- Implants look worse at week 3 than at week 1 The post-surgical swelling of week 1 temporarily makes the implants look full and positioned. As swelling reduces in weeks 2–3 but before drop and fluff has produced visible settling, many patients feel their result has deteriorated. It has not. This is a normal transitional phase.
- One side always drops first Virtually every patient notices one breast settling faster than the other. This causes significant anxiety — patients fear asymmetry. In the vast majority of cases, the other side catches up within weeks. True lasting asymmetry from surgery is uncommon; asymmetric settling during recovery is nearly universal.
- You cannot assess your result for 3–6 months The shape at 6 weeks is better than week 1 but still not the final result. The shape at month 3 is close. The final shape — including full softening of the implant and complete scar maturation — takes 6–12 months. Patients who assess at 6 weeks are not seeing their outcome.
- Upper body strength takes weeks to return Submuscular placement specifically affects upper body strength during recovery. Pushing, pulling, and reaching movements feel weaker than before surgery for 3–6 weeks. This resolves fully — it is not permanent — but it catches many patients off guard, especially those who exercise regularly.
- Sleeping position matters more than most patients realise Sleeping on your front is not just uncomfortable — it puts direct pressure on the implants before the pocket has formed. Back sleeping for 3–4 weeks is a clinical requirement, not a preference. A body pillow to prevent rolling helps significantly.
- Scars are more visible than patients expect at first The incision scar — whether in the fold, around the areola, or in the armpit — goes through an inflammatory phase at weeks 3–6 where it appears redder and more prominent than immediately after surgery. This is normal wound healing, not a bad scar result. The 12-month scar looks dramatically different from the 6-week scar.
Breast Augmentation Recovery in Turkey: The International Patient Timeline
Minimum stay in Turkey: 5–7 days. Surgery day, 1 night hospital or observation, 3–5 nights hotel recovery, and a final surgeon check-up and fit-to-fly assessment before departure.
Day by day:
- Day 1: Surgery, 1 night monitoring
- Days 2–5: Hotel recovery — rest, wound care, prescribed medications, gentle walking
- Day 5–6: Follow-up appointment — wound check, bra fitting confirmation, fit-to-fly assessment
- Day 6–7: Departure
Flying home:
- Compression stockings for the flight — DVT risk is elevated post-surgery
- Keep the surgical bra on throughout the flight
- Avoid overhead lifting completely — ask for assistance with carry-on luggage
- Short-haul cleared at day 5–7; long-haul at day 7–10 with surgeon confirmation
After returning home:
Your Turkey breast implant surgical team manages follow-up remotely. At The More Clinics, your personal treatment assistant is your direct contact for 12 months after surgery — for questions about drop and fluff progress, bra guidance, scar management, and any concern that arises during recovery.
Important: Tell any local healthcare provider you encounter that you have breast implants. Carry your implant card (provided by the plastic surgery clinic) with implant make, model, and serial number. This is medically relevant for mammograms and any future breast imaging.
Red Flags: Normal vs. When to Contact Your Surgeon
Normal — Do Not Panic
- Swelling and tightness in weeks 1–3
- Bruising extending beneath the breast or to the ribcage
- Implants sitting very high in weeks 1–3
- Asymmetric drop and fluff — one side settling faster
- Numbness or tingling around the areola or breast skin
- Shooting electric sensations — nerve regeneration, positive sign
- Firmness of the implant area — softens progressively
Contact Your Surgeon Promptly
- Fever above 38°C / 100.4°F
- Increasing pain after day 5 rather than decreasing
- Significant sudden swelling on one side only — possible haematoma
- Redness, warmth, or pus at any incision site
- Implant appearing to shift dramatically in position
- A new hard mass forming around the implant — possible early capsular contracture
- Calf pain, leg swelling, or shortness of breath — possible DVT, emergency
Frequently Asked Questions
How long is breast augmentation recovery?
Most activity restrictions are lifted by six weeks, but it can take three to six months for all residual swelling to disappear and for your implants to fully settle into their final position. Return to desk work is week 1–2; full exercise week 6–8; final result month 6–12.
What is drop and fluff?
Drop and fluff describes the gradual process where your pectoral muscles relax and the implants settle from their initially high position into a more natural placement. As the muscle releases tension and the implant pocket matures, the implants shift downward while the lower portion of the breast fills out and softens. Dropping is mostly complete by week 8–12 for most patients. t
When can I exercise after breast augmentation?
Light lower body cardio at week 3–4. Full gym return and upper body exercise at week 6–8 with surgeon clearance. Chest-specific exercises — press, fly, push-ups — typically not before week 6–8. High-impact exercise should be reintroduced gradually with a supportive bra.
When can I sleep normally after breast augmentation?
Most surgeons recommend sleeping on your back for at least two to four weeks. Side sleeping is typically cleared at week 3–4; front sleeping is generally not advised until month 2–3 and requires a softer surface.
When do breast implants drop and fluff?
The process typically begins around weeks 3–4, with the most visible changes between months 1 and 3. Complete settling can take up to six months depending on implant size, placement, and individual tissue response. Submuscular placement takes longer than subglandular.
Is it normal for one breast to drop faster?
Asymmetric settling is one of the most common concerns during recovery and it is almost always normal. One breast may swell more, bruise differently, or begin the drop and fluff process before the other. This typically equalises within a few weeks to a couple of months.
When can I wear a normal bra after breast augmentation?
Underwire bras are typically cleared at week 6–8 with surgeon assessment. Before that: surgical bra for weeks 1–2, soft support bra for weeks 2–6. The restriction on underwire exists because the wire sits on the lower pole where the implant is settling — pressure can displace the implant before the pocket is stable.
When can I drive after breast augmentation?
Week 1–2 — once off all prescription pain medication and physically able to make an emergency stop without flinching from chest pain. Do not drive while taking opioid pain relief.
How long do I need to stay in Turkey for breast augmentation?
Most patients plan 5–7 days: surgery day, 1 night hospital, 3–5 nights hotel recovery, and a final surgeon check-up and fit-to-fly assessment. Shorter stays are possible for straightforward augmentations; combined procedures (augmentation with lift) benefit from 7–10 days.
Will breast augmentation scars be visible?
The incision scar — placed in the breast fold, around the areola, or in the armpit — is permanent but positioned to be hidden. It goes through an inflammatory phase at weeks 3–6 where it appears redder than it will ultimately be. At 12–18 months, scars are typically pale and flat. Silicone gel applied consistently from week 3–4 and SPF 50 on any sun-exposed scar are the most effective tools.
What can I do to speed up breast augmentation recovery?
Wear your surgical and support bra consistently, sleep on your back for the required period, avoid upper body exercise before clearance, eat adequate protein, stay hydrated, do not smoke or vape (nicotine restricts blood flow and impairs healing), attend all follow-up appointments, and — most importantly — be patient with the drop and fluff process. Compliance with each of these consistently produces the best outcomes.
The Last Word from The More Clinics
Breast augmentation recovery is more gradual — and more rewarding — than most patients expect. The first three days are the most demanding; most patients feel close to normal by week two. The result that emerges by month three is the beginning of what patients waited for. The final, fully settled result at month six or twelve is what the procedure was designed to produce.
For medical tourism patients recovering in Turkey, The More Clinics coordinates your full recovery stay — hotel setup, wound care guidance, fit-to-fly assessment, and 12-month remote follow-up after you return home. Your personal treatment assistant is your named contact throughout.
A free consultation gives you a realistic recovery timeline for your specific anatomy, implant placement recommendation, and transparent all-inclusive cost.
Book a Free Consultation → WhatsApp Us →
Medical disclaimer: This guide is for informational and educational purposes only. Individual recovery experiences vary based on implant placement, patient health, and surgeon technique. Always follow the specific post-operative instructions provided by your surgeon.
This article provides general information and does not replace an individual medical assessment, diagnosis or treatment advice. Discuss decisions about your health and treatment with your treating clinician.